The point of this page is to teach new editors how to edit on ProleWiki technically, if they're not familiar with MediaWiki.
Everyone is free to add to this page!
First: read our editorial guidelines
Please read our Editorial guidelines before you start editing, which will help you catch on to our writing patterns quickly. As much as possible, we like to harmonize the feel of our pages so that they look uniform instead of taking on the style of each individual editor, and our guidelines help with that.
Creating a page
Editing a page
To start editing a page, head on over to its URL and then click on the blue "Edit" button in the top right corner. If you don't see the button, there may be two reasons:
- The page is protected against edits (this is the case for official ProleWiki pages)
- You are not logged in
Once you click on the button, you will be taken to the visual editor, which is a WYSIWYG editor (what you see is what you get): it works much like Google Docs or any other text software you use.
Formatting your text
Using Headings correctly
Adding sources
Adding notes
Using templates
Filling an infobox
Writing the edit summary

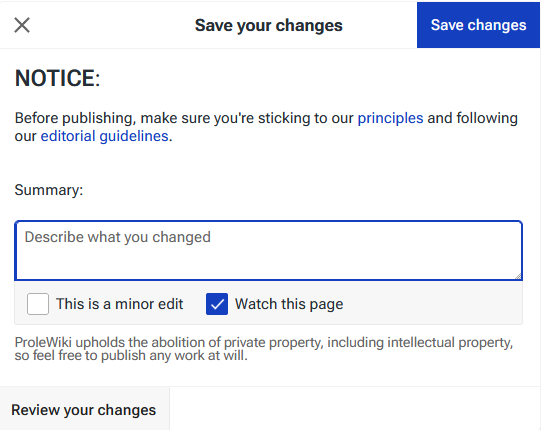
Once you're done with your edit and click "Save changes", you will get to fill the edit summary. You can see how it looks on the right.
When editing the summary, you have three things to look at:
- Writing the summary itself
- Checking the "minor edit" box
- Checking the "watch this page" box.
In the summary, you should be concise but exhaustive. Briefly explain all the changes you brought to the page in a way that will help other editors see what you edited at a glance.
You can check the minor edit box if you want; there's no hard rule about this, but generally we reserve the minor edit mention for maintenance work: fixing typos and grammar, mostly.
Finally, you can choose to start watching this page. This will put its name in bold in the Special:RecentChanges page so that you can find new edits at a glance.
To unwatch a page, you can open your user profile on the bottom left of the screen and click on "Watchlist".
Creating an Essay
Understanding namespaces
Namespaces are a particularity of MediaWiki, but they're not difficult to understand.
We talked about the Special:RecentChanges page just earlier. The colon (:) character indicates that Special is a namespace. After the colon is the page name.
On ProleWiki, we use the ProleWiki: namespace for everything that is official or related to the wiki itself. We also have the Essay: namespace, as you might have guessed, and finally we'll look at the Library: namespace in the next section.
Creating the Essay itself

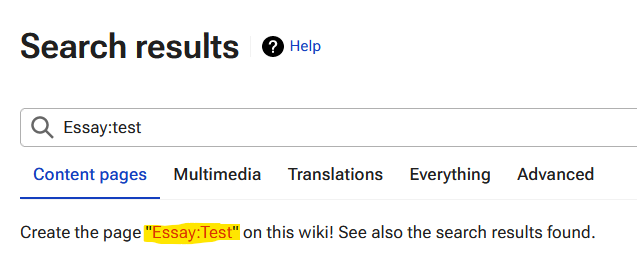
To create an essay, you would then have to add the Essay: namespace to a page.
But how do you "add" a namespace? Well, you have to create your page (like you would create a normal article page) and add the namespace yourself, like on the image on the right. Then click on the red link, like it is highlighted in the screenshot.
Once again don't forget ProleWiki is case-sensitive! Don't forget to type in Essay and not essay (although normally, the software should automatically capitalise the first letter of a new page).
Writing your essay
Rules of writing
Essays are very free-form and almost everything is allowed (the only rule of thumb is don't write anything that would damage ProleWiki). Unlike articles, you can write an essay about whatever you like in any way, shape or form you like!
Adding your essay to the Essays section
Finally, once your essay is written and published, you need to add it to the Essays section. It's a bit of an involved process, but once you get the hang of it, you'll be able to do it in no time.
First, edit the List of works section.

We add author names in Alphabetical order (A-Z), so scroll down to where your row would appear in the table.
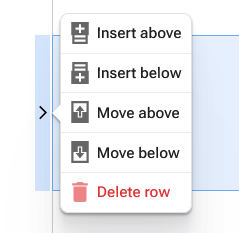
Click on the row above where yours would be (if your name is Cwal, for example, then you would add your row under CriticalResist, as Cw is after Cr in alphabetical order) and then click on the small arrow that appears (refer to the image on the right).
Then, left click on "Insert below" to add a new row.
Double click on the new row to start writing in it. First, add your username in the first column. Then select your username in its entirety, and press Ctrl+K on your keyboard to open the link box. Link your username to your page; you can simply type Comrade: followed by the first letters of your username and it should find it automatically.
Press enter to confirm the link.
Double click on the second column and add a bullet list. You will find it at the top of the visual editor, between "Cite" and "Insert".
Type in the name of your essay (preferably in italics) in that bullet list. Then link to it by selecting your essay's title, hitting ctrl+k, and typing Essay:your essay name. The box should find it automatically but if it doesn't, you can also paste the entire URL in the box.
Finally, save your changes on the page and you're done!
Adding works to the Library
Uploading images

Using your Sandbox page
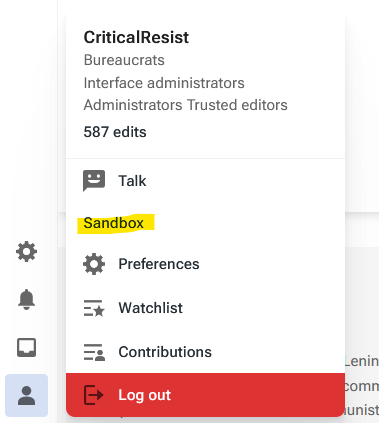
Your sandbox page is a special page that is used to try out things. Most editors like to use it to save drafts they are working on until they're ready to be published into an actual page.
To get to your sandbox, the easiest way is by opening your profile on the bottom left and clicking "Sandbox" (as per the picture on the right).
Use that page as you like; you can edit it however you want (to try out templates, formatting, or save your drafts) without impacting the rest of the site if you mess up something.
Shortcut references
Here are all the shortcuts you can use when editing with the Visual Editor (in progress):
| Shortcut | Effect |
|---|---|
| Ctrl+b | bold |
| Ctrl+i | italic |
| ctrl+k | link |
| ctrl+2
ctrl+3 ... ctrl+6 |
Heading,
Subheading 1, Subheading 2, etc. |