More languages
More actions
The point of this page is to teach new editors how to edit on ProleWiki technically, if they're not familiar with MediaWiki.
Every editor is free to add to this page!
First: read our editorial guidelines
Please read our Editorial guidelines before you start editing, which will help you catch up on our writing patterns quickly. As much as possible, we like to harmonize the feel of our pages so that they look uniform instead of taking on the style of each individual editor, and our guidelines help with that.
Understanding the ProleWiki interface
ProleWiki uses the Citizen skin to theme our website on desktop. You can change your theme in your Preferences if you want to use another one.
The menu is located on the left and is a vertical menu. We'll go through every icon and button on that menu. (icon pictures to be added in guide)
Did you know? You can type / on any page to bring up the search box
Logo
The first icon starting from the top is the logo. Clicking on it will take you back to the homepage of the language instance you are currently in.
Search
The magnifying glass icon lets you search for a page. Simply click on it, and a search box will appear in the middle of the screen, near the top. Type your keywords and hit enter to search. As you type, suggestions should fill out beneath the box. The search function is a bit unwieldy and will, by default, only search for page titles. If you want to search for content, you need to click "search for pages containing [keyword]".
Sometimes, it might not find anything despite the page existing because ProleWiki is case sensitive. If you search for "karl marx" for example, the function won't return any results. If you search for Karl Marx however, you will find his page
That's why it's important to search exhaustively before creating a new page, so that we don't create duplicates.
The three lines stacked on top of each other are what's commonly called a hamburger menu. Clicking on this button will open a megamenu. We won't go through this megamenu, but you will likely use the first column (Navigation) a lot. You will also likely use the "Content" column too, to access Essays and the Library.
Theme settings
At the bottom of the navigation bar, we have first a gear icon. These are theme settings: they will only apply to this theme. You can change the font size, use a dark theme for nighttime use, and find other settings that can make your reading experience more comfortable. These settings only apply to you.
Alerts
The bell icon opens your alerts. You also receive a notification badge in it if something changes. These alerts will only notify you about things related to your account, usually after an administration action. When you are added to the Trusted group, for example, you will receive an alert.
Notices
The inbox/drawer icon opens your inbox. This is where you receive notifications about your activity on the wiki. For example if you are watching a page (refer to Watchlist) and someone adds a topic to the talk page, you should receive a message in your inbox.
Account
The last icon, showing a person, is for your account management. From there, you can access several of your account pages (Talk, Sandbox...) as well as change your Settings (also called Preferences).
Visual editor guide
We don't recommend using this as a tutorial. Instead, you should use this as a reference guide when you need to do something but can't find out how.
Creating a page
You cannot create pages until you earn the Trusted role. For more information, refer to the Editor Onboarding page.
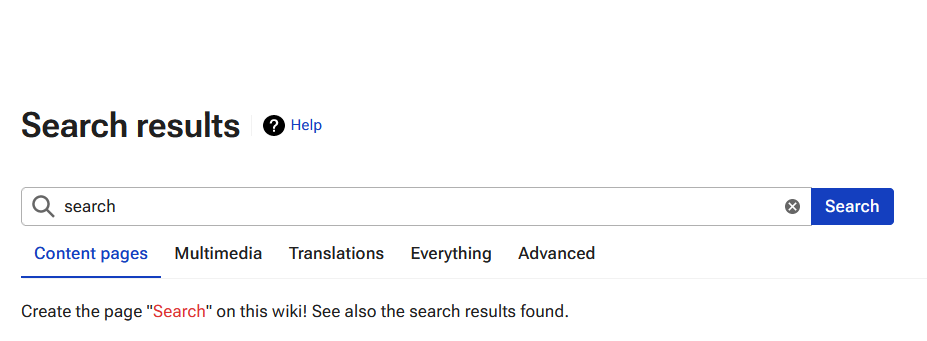
Creating a page on MediaWiki is a bit of a pain. The easiest way is to search for your page.
Simply click on the magnifying glass icon in the top-left corner, and type in the name you want to give your page. If it doesn't exist (example here: Search Result), you will be taken to the search results page where you should see something like the screenshot on the right.
You can then simply click on the red link beneath the search box to be taken to the editor and create your page. Your page will not be created (published) until you type something in the editor and hit "Save changes" (in the top-right corner, or Ctrl+S on your keyboard).
Remember that ProleWiki is case-sensitive! This means Fidel Castro is a different page from Fidel castro! (Only the C in Castro changed, and you can see the first page exists, but the second doesn't -- the link is red). For this reason, please search the wiki exhaustively before creating a new page.
To avoid that problem, you can create Redirections from one page to another. Click the link to be taken to that part of the guide.
Our convention is normally sentence case. Please refer to the Editorial guidelines.
Creating a page in a namespace (Library, Essays, etc)
If you want to create a page in a namespace, such as a library work or an essay, you need to follow the same procedure but add Library: or Essay: before the search. Example: Library:The communist manifesto. Remember you need the : colon, and you must type the exact namespace. Essays, for example, will not work (the namespace is Essay, singular).
It's a bit wonky but this is due to how MediaWiki works. The rest of the procedure is the exact same as any other page (click on the red link and fill in your page).
Editing a page
To start editing a page, head on over to its URL and then click on the blue "Edit" button in the top right corner. If you don't see the button, there may be two reasons:
- The page is protected against edits (this is the case for official ProleWiki pages)
- You are not logged in
Once you click on the button, you will be taken to the visual editor, which is a WYSIWYG editor (what you see is what you get): it works much like Google Docs or any other text software you use, complete with shortcuts.
Note that ProleWiki does not save drafts. If you don't save your edits before closing the editor, they are completely gone with no way to recover them!
Formatting your text
At the top of the page in the visual editor, you should see the word Paragraph. This is the style that is currently being used to whatever you are typing. If you click on that word, it will open a submenu with several other styles you can use, much like in Google Docs or Word.
To use a style, simply place your cursor anywhere in the paragraph you want to style (styles apply to entire paragraphs and not single words), and click on the style you want to use. It will then apply it and you should see the change happen in real time in the editor.
Using headings correctly
You can use headings with Ctrl+2 up to Ctrl+6, going from a Heading to a sub-heading of fifth importance. Note that Ctrl+1 will use the Page Title style, which will style your paragraph exactly like the page title. We never use that one and have no idea what the use of it is.
Regardless, when editing you should use headings as much as possible. However, keep in mind there should not be any reason to go beyond sub-heading 2 in most cases. That is to say, just because you have 5 headings at your disposal, doesn't mean you need to use all of them.
Headings follow a hierarchy, which you can see on this page itself for example. You should start a chapter with a Heading (Ctrl+2), then add a sub-heading 1 in it (Ctrl+3). Sub-headings 2 are nested inside sub-headings 1, etc. Or in other words, a Sub-heading 3 never comes before a sub-heading 2.
Of course, you separate sections (or chapters) with the main heading (ctrl+2).
Adding sources
Comrade! Please source your edits as much as possible. There is no such thing as too many sources!
To add a source using the visual editor, you first need to place your cursor where you want the source to appear. It will look like this.[1]
Then, open the "Cite" menu at the top of the screen and select one of our templates: usually Book or scientific article or Website or newspaper article.
Click on the appropriate template and it will open a box asking you to fill in some data such as year of publication, author, title, etc. You don't have to fill everything in the box, but you should still fill out as much as possible of the template. Once you're done, click Insert in the top right corner.
While you will see the little blue [1] mention, you won't see your reference at the end of your page if you are adding the first citation. That is because you still need to insert the Reference list. To do that, click on Insert in the top menu, then on "More" (with an arrow pointing down) in the menu that opens, and then on References List (preceded by a book icon).
Finally, you need to add a Heading (Ctrl+2) and name it References, right above the list you just added (MediaWiki doesn't do it by default).
If you did everything correctly, it should look like on this page: Fidel Castro. Note that per our Editorial Guidelines, references go at the very end of a page.
Reusing a source
Sometimes, you might need to reuse a source on a page. You can simply do that by clicking Cite -> Re-use. This will then bring up a box with all the sources added so far, and you can simply click on the source you want to reuse.
Adding notes
Notes work much like References technically, and in fact are considered references. To add them, you would add the Cite -> Basic (Ctrl+Shift+K) template. Type in your note in the box and then write "note" in the "Use this group" option. It will look like this:[note 1]
To make notes appear, you would then have to add a References list (on top of the actual references list that exists). Select it, click edit, and then add the "note" group into it. Then you need to add a heading called Notes above the list. In terms of page structure, Notes should be the second-last heading, with References being the last heading on the page.
We don't use notes a lot (it's preferable to add a source or internal link, i.e. bluelink), but they can be useful in some cases.
Templates
What are templates
Templates are specific pieces of (MediaWiki) code that do something you might need, which is usually visual. For example, infoboxes are based on a template. Some templates are very specific, and others are more general. In the future, we'll list the Templates you can use as
Our existing templates can be found by searching for "Template:" on the wiki (it's a namespace like Library or Essays).
Including a template in a page
To use a template, the easiest way is to type {{ while editing a page with the visual editor. This will bring up the template box. from there, you can type the name of the template you want to use (we don't use "infobox" by the way, but only "infobox country", "infobox film", "infobox person", etc).
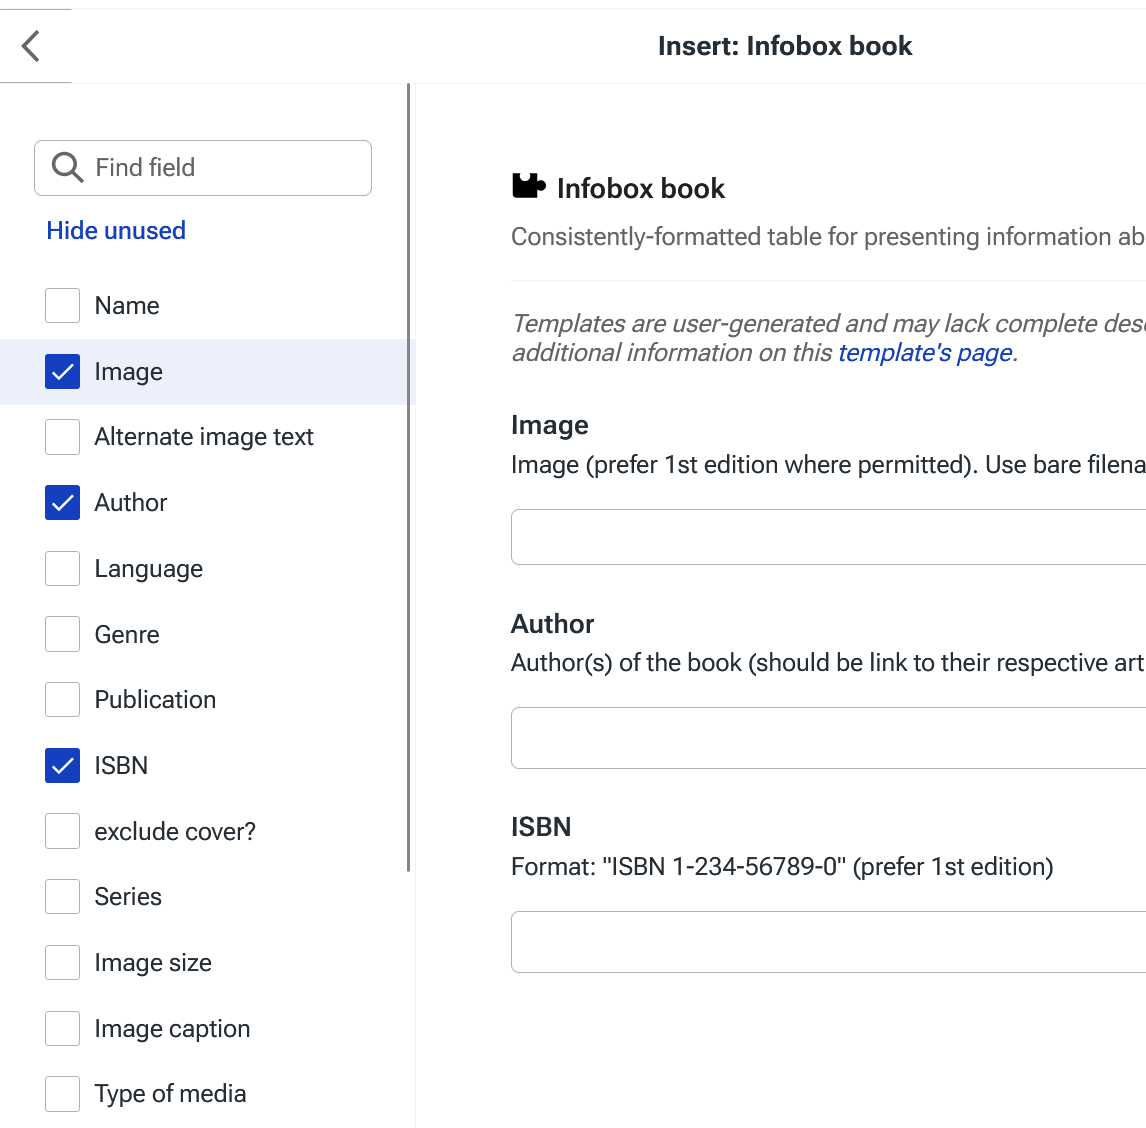
Once you start typing the template's name (remember that as always, it's case-sensitive), a dropdown menu will appear to suggest some templates. Click on the one you want and, if you picked the right one, you should see parameters displayed (see screenshot). You can type the relevant information in these parameters and then click save, and your template will be imported.
To edit a template, double click on it.
Adding more parameters
With some templates, you'll see additional parameters you can use on the left. For example on the screenshot of the book infobox, you can choose to add the publication, language, and specify the image size. Just click on the checkboxes on the left to add the parameter to the template you are editing.
Using an image in templates
For images, type the filename as exists on the wiki. Remember when you upload a picture, you are asked to provide a filename. Just type the name as is; it's not the URL or the raw file name (with extension), but the one you wrote when uploading the picture. There is also an autocomplete dropdown menu that will appear once you start typing.
Templates we use
- Infobox: person, film, company, country
- For library works: Library Work
- You can change the displayed title by typing {{DISPLAYTITLE:your title here}}. It's not a template per se, so close the template window once you type the two {.
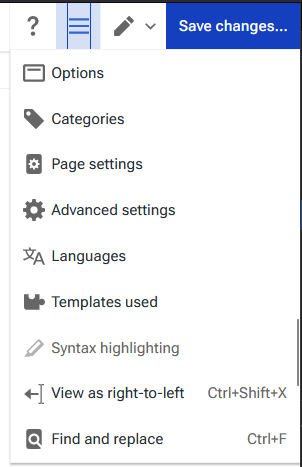
A button we haven't looked at yet is the collapsed menu in the top right of the visual editor (see screenshot).
From this menu, you can access several "meta" settings (that apply to the whole page regardless of content) that we'll cover below:
Options
Takes you to a box that shows almost all of the following options below.
Categories
This is where you add a category to a page. Categories look like this: Category:Imperialist organizations. They can be useful in some cases and pages should, as much as possible, be categorized.
To add a category to a page, start typing the name of the category you want to add in the "Add a category to this page" field. Remember that categories are case-sensitive. As you start typing the category name, a box should appear below the input field suggesting existing categories. Simply click on one of them to confirm your input, or keep typing to create a new category. Press enter to create your new category once you've entered the full name.
Pages can have more than one category, so simply repeat the process to add more categories to a page.
You can delete a category by clicking on its name in that box and then the trashcan icon in the submenu that opens.
As much as possible, please make sure not to create duplicate categories!
Page settings (redirections)
Page settings is mostly from where you will be able to create redirects, although they are arguably easier to make in the source editor (fewer clicks needed).
To create a redirection, you first need to create a new page. For example, let's say you want to redirect China to People's Republic of China (our preferred name for this page as ProleWiki uses a country's full name to title its page). This means that you would first need to create the China page, and then, without adding anything in the editor, go to Page Settings.
Check the "redirect this page to" box, and then start typing "People's Republic": the correct page should appear in an autocomplete field.
Click on that page to select it, and then click on "Apply changes". Finally, don't forget to save your edits and commit them. From now on, the China page will redirect people automatically to the People's Republic.
Advanced settings
You normally don't need to change these settings. You can mark this page as noindex for search engines, which means it shouldn't appear on Google if you do (on by default), and you can show a tab on this page to add a new section, which at this time this guide does not cover.
Both should be on the "default" setting, but you are free to disallow indexing of your essays if you want.
Languages
To add a page in another language (which makes it easily accessible from one language instance to another), you need to use the Source editor for now. (To be added).
Templates used
This setting shows which templates are used on the page. It can be useful on large pages sometimes to know which templates are being used, but this is mostly for debug reasons. This is not where you add a template from: please refer to Using templates.
View as right-to-left
Find and replace
Find and replace can be accessed by the ctrl+F shortcut. It will pop a menu at the top of the page. It's pretty self-explanatory, you can decide to only find a string of text, or also replace it if you type something in the "Replace" field. You also have options to match case (e.g. only find KEYWORD and not Keyword), use regular expressions code (regex), look for whole words, or ignore diacritics.
Saving your edits
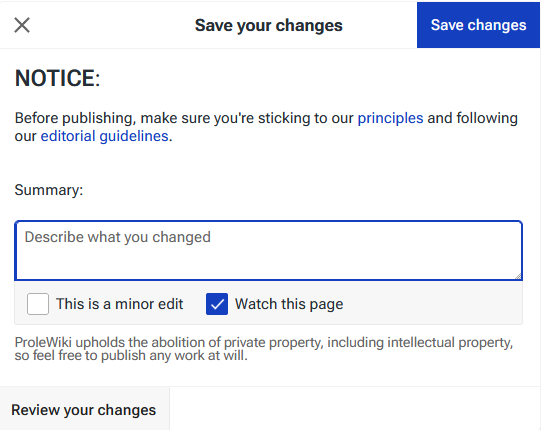
Once you're done with your edit and click "Save changes", you will get to fill the edit summary. You can see how it looks on the right.
When editing the summary, you have three things to look at:
- Writing the summary itself
- Checking the "minor edit" box
- Checking the "watch this page" box.
In the summary, you should be concise but exhaustive. Briefly explain all the changes you brought to the page in a way that will help other editors see what you edited at a glance.
You can check the minor edit box if you want; there's no hard rule about this, but generally we reserve the minor edit mention for maintenance work: fixing typos and grammar, mostly.
Finally, you can choose to start watching this page. Refer to the Watchlist in this guide.
To unwatch a page, you can open your user profile on the bottom left of the screen and click on "Watchlist".
Creating an Essay
Understanding namespaces
Namespaces are a particularity of MediaWiki, but they're not difficult to understand.
We talked about the Special:RecentChanges page just earlier. The colon (:) character indicates that Special is a namespace. After the colon is the page name.
On ProleWiki, we use the ProleWiki: namespace for everything that is official or related to the wiki itself. We also have the Essay: namespace, as you might have guessed, and finally we'll look at the Library: namespace in the next section.
Namespaces help us pre-categorize pages correctly. They also let you know what a page is about or related to at a glance.
Creating the Essay itself
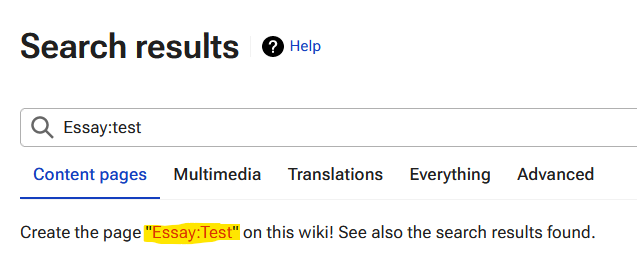
To create an essay, you would then have to add the Essay: namespace to a page.
But how do you "add" a namespace? Well, you have to create your page (like you would create a normal article) and add the namespace yourself, like on the image on the right. Then click on the red link, which is highlighted in the screenshot.
Once again don't forget ProleWiki is case-sensitive! Don't forget to type in Essay and not essay (although normally, the software should automatically capitalise the first letter of a new page).
Writing your essay
Essays are very free-form and almost everything is allowed (the only rule of thumb is don't write anything that would damage ProleWiki). Unlike articles, you can write an essay about whatever you like in any way, shape or form you like! They are your essays and nobody else will edit them.
Otherwise, you would write an essay exactly the same way you would edit a page, refer to the Visual Editor section for further help.
There is one exception, which is essays marked Open source (previously public domain, but they are not actually in the public domain). These you can edit anytime you want.
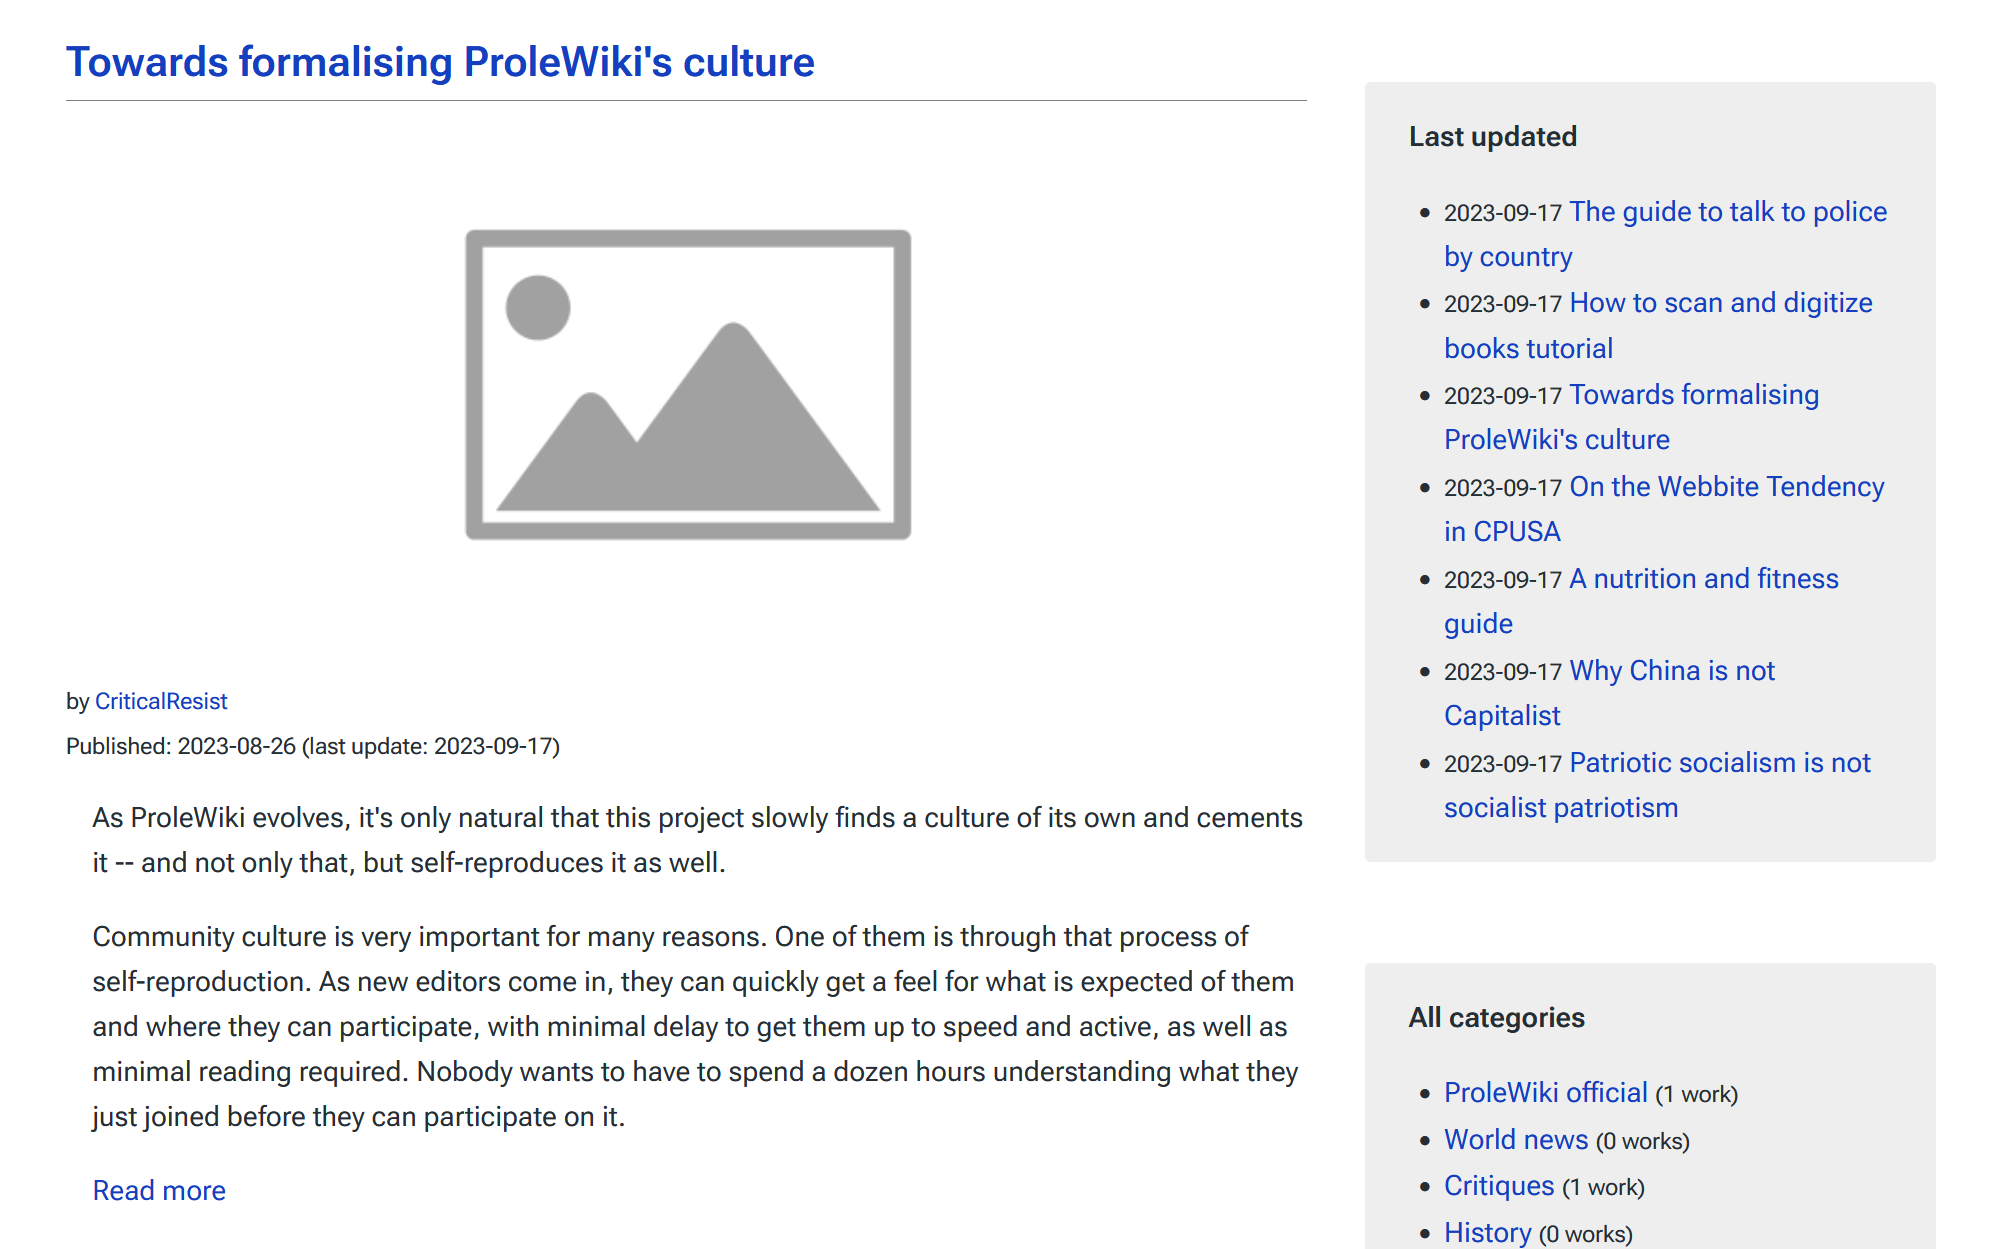
Adding your essay to the Essays homepage
Updated September 2023 to reflect the new essays page
We have an editor-in-chief since October 2023 for the new essays space. Before adding the category to make your essay show up in the new space, contact Comrade:420dengist. He is in charge of deciding when your essay will be published.
First things first: making your essay show up
You can create an Essay at any time and add the template whenever you like.
However, to appear on the essays page, you will need to add two things to your essay page:
- the 'infobox essay' template
- the Essays category.
We've explained how to add categories here. If you have only one of those two things set up, your essay will not show. You need both on your essay page.
The idea is that you can add the template at any time, but you should add the category only once your essay is ready to be published. This allows you to work on it as a draft until it's ready to be seen by our readers. You decide when your essay is ready to be seen.
Adding the template
The template that makes your essay all pretty in the front end is the Infobox essay template (it adds the picture, the author's name, the excerpt etc.). We talked about templates here.
You can also refer to the template documentation but we've copied it below.
You add a template in visual editor by typing in two curly brackets {{. In the window that pops up, search for Infobox essay and click it in the auto-complete field.
There, you will be asked to provide a few parameters:
- Title: The title of your essay exactly as it's written in the URL (case-sensitive but no need for underscore characters). If you mistype the title, the link will not work. Required.
- Name: we've added a "name" field that will rename your essay on the front end only. Optional. You can also just move your Essay page to a newly titled one.
- Author: Your username, or "Open source" if you want to allow other editors to edit this essay. It will link to your user page, so again type your username exactly as it appears on ProleWiki. Required and case-sensitive.
- Image: a filename (full name with extension) of your choice. Note that the image is a banner format, i.e. wide and not very tall (300px tall). If you don't specify an image, a placeholder will be used (but please as much as possible try to find a cool illustrative image for your essay).
- Date: The date you added the Essays category to this essay to ProleWiki in the YYYY-mm-dd format, e.g. for September 3 2022, you would write 2022-09-03. Required.
- Excerpt: a small excerpt (one or two paragraphs long) from the essay. Normally you would use the first sentences from the essay itself, but you can put in anything you like in there. Please remember to remove links and references brackets[1] from the excerpt. Required.
NOTE: I recommend you open the page history in another tab and copy the excerpt before you add the template, because all parameters except "image" and "name" are required. That is to say, the visual editor will not let you leave the template window unless you input something into all the fields.

Quoting from your essay
We have a "quote" template called Essay quote. It takes three parameters:
- Quote: The quote you want to single out. I recommend 30 words at most.
- Align: left, right or center. On mobile, will always be centered. Just try them all out to see how it changes the look!
- Bottom: you can extend or retract the bottom margin to offset more paragraphs. Takes a numeric value that can be above or below 0. Useful in some cases for tech reasons but as an end user, just check how your quote looks and fiddle with the bottom-margin if it doesn't look good to indent more lines from the text (positive value), or fewer (negative value).
Your quote will appear in big characters, you might have seen something similar in other publications before. It looks pretty cool.
Most common issue: typos in title
The title parameter needs to take your essay's title exactly as it is in the database. Or, in other words, exactly how you named the page when you created your essay.
The most common issue is retyping the essay's title incorrectly, for example forgetting punctuation or adding a capital letter. You'll know if the template was set up properly if the reading time estimate shows something like "X-Y minutes" (with X and Y being numbers). If it says "Error: Invalid content" after you save your edit, then you likely messed something up
To prevent that I would recommend you copy-paste your essay's title when adding the template, to make sure you don't make a mistake.
Adding content categories
You can add some content categories to your essay as well; as you can see on the screenshot above, there is an "All categories" item on the sidebar with categories such as World news, Critiques, History, etc. You simply have to add the categories to your essay as you would for any page, covered here.
The format for our essay categories is like this: XYZ (essays) for content categories (World news (essays), Current AES (essays), History (essays) etc).
While you are allowed to add new content categories in the sidebar, it's better if these are discussed with the other editors first and so this guide will not cover this process (it involves editing the template Essay_categories).
Adding author category
You can easily add yourself into the "All authors" sidebar item without requiring any help other than this guide.
First, you need to create a category called Essays by X, where X is your username.
Then add this category to every one of your essays manually.
Finally, open your "Essays by X" category in a new tab and add the following code from the source editor:
<dpl>
category=Essays by X
mode=userformat
includesubpages=false
ordermethod=firstedit
order=descending
listseparators = \n
addeditdate=true
userdateformat = Y-m-d
format = ,\n* [[%PAGE%|%TITLE%]], (%DATE%)
</dpl>
[[Category:Essays by author]]
Just don't forget to change the category name ("Essays by X" to your name) in the code above, save, and you're done!
Clearing the cache
The essays homepage updates every day (not sure exactly when though). But if you want to update it instantly, you only have to go to the essays homepage, click on the three dots to open the submenu, and select Hard refresh to clear the cache. This will make your essay show up in the main feed as well as update everything else on the page (the last updated sidebar etc).
Adding works to the Library
See main article: ProleWiki:User guide/Library
The library has been completely remastered in June 2023, check the link above to edit the front page of the library and categorize uploaded books.
Adding a book
To add a book, you first need to create the page for it in the Library: namespace. Look at creating a page for help. The very first thing you should do once you open your book's page is to add the Library work template to it. Simply type two brackets {{ and a window will open. Type "library work" and use autocomplete to select it.
Adding the infobox is an essential part and should not be skipped over; it tells readers who the author of the book is, when it was written, etc. Fill that infobox as much as you can.
Then, import your book (look at this page for useful regex functions that make formatting books much faster). Our library is generally text-only, so while you can upload a PDF, it will eventually have to be transcribed into raw text. For that, you should use OCR tools.
Once your book is finished and properly formatted (that is to say, in a readable format with typos fixed, references using with our templates, etc), you can add categories. To be findable by readers, your book needs to be in a category (i.e. a card) which appears in the Library front page. If you forget to add categories or add categories that were not added to the front page, then you can assume nobody will be able to find your book.
Note that ProleWiki does not edit books we upload. We upload them as is: please do not remove anything from books without asking the editorship first for opinions.
Adding chapters (subpages)
One thing we do sometimes with especially large books, such as Capital, is to separate chapters into their own page. This looks something like Library:Capital, vol. I/The production of absolute surplus-value. The slash symbol / denotes a subpage, i.e. a page inside a page (The production of absolute surplus-value is located inside Capital, vol. I).
Creating a subpage works exactly like creating a new page. However, the easiest way is to go to the root page, e.g. Library:Capital, vol. I, and then add
[url]/The_production_of_absolute_surplus-value
To the URL itself in your browser. Note that spaces should be replaced by underscore _ characters.
Adding a table of contents
With subpages comes a table of contents so that people can actually navigate from the main page to the subpages and back. This is done using a Template (see Using templates in this guide), with each template being used for one specific book. If you don't want to create a template for it, it's possible to create a simple unordered list like so:
- Heading 1
- subchapter
- subchapter
- etc
Simply type an asterisk * in the visual editor followed by a space to create a bullet point. Then hit Enter to create the next bullet point, and use the TAB key to create a subchapter bullet.
Afterwards you will need to add links (ctrl+K) to each bullet point. We also recommend having the table of contents at the very top of each subpage (i.e. chapters) to make navigation easier.
Uploading and using images
Note: you will not be able to upload images until you receive the Trusted role. Refer to the Editor onboarding page for more information.
There are two ways to upload images.
Method 1: from the Upload page
There is a page to Upload your files from.
Select a file from your computer in the Source filename field.
The destination filename is what its name will look like on ProleWiki. It will automatically fill that field based on your filename.
The summary is a brief explanation of what your image depicts or what the document you upload is.
Once you have uploaded your image, follow Method 2 to know how to include it in a page.
Method 2: from the visual editor
This is the easiest method as in most cases, you are probably uploading a picture while you are editing a page.
From the visual editor, click on Insert in the top menu, and then pick the first option: Images and media.
A box will open and show your latest uploads. If you've used method 1, this is how you would find the image you uploaded and insert it in the page: just click on it, then click on Use this image in the top-right corner of the box.
If you need to upload the image first, then once you open the Images and media box, click on the Upload tab near the top of that window. You will be able to select a file from your device. Then, click on "This is a product of human labour" (for the story, we can't get rid of this disclaimer which by default says "I confirm I have the rights to use this image"). You will then be taken through the same process outlined in the last paragraph where you get to fill your image's info.
You will then be taken to a third screen to write a caption and provide alt text. You should always fill in the alt text for our handicapped comrades. The caption is important as it shows under the picture and helps explain what exactly the picture is. If you upload a data graph, for example, it's good practice to provide a caption to explain what the graph shows.
Best practices (please follow)
Please remember that we need to be accessible to people with disabilities and other impairments. For that reason, please name your file with a clear, accurate name (and not asbjsfjbgfabrhb_final_final.jpeg) that represents the document. This will be used as its alt text in the file page.
You don't have to fill the summary as we don't use it (although it's good practice to write what the picture is about e.g. what it depicts, in a concise manner) but please caption your pictures once you add them to a page! Please also fill the alt text when you add a picture to a page: you can simply copy the caption and paste it in the alt text field.
Formatting a picture in the editor
Once you've added your picture as you are editing a page, you can format it a little bit.
In the visual editor, by selecting and dragging the bottom-left corner of the picture, you can change its size.
By clicking on the picture and selecting the Edit tab, you can format it a little bit more: align it left, centre, or right (right is selected by default), wrapping text around it, and selecting how the image displays (thumbnail is selected by default). If you change the format to Frameless for example, you can align a picture in the centre of the page between two paragraphs, which is great for a gallery view:
Finally, you can also drag your image somewhere else in the article by simply dragging and dropping it around. A line will appear between paragraphs to show you where the top of your image will align. Does it sound confusing? Don't worry, the first time you do it, you'll get it right away.
Please note that we normally keep default alignment in pictures as per our conventions (thumbnail, aligned right, text wrapping on). You can change this alignment as you please in Essays, but not necessarily in articles.
Using talk/discussion pages

All wikis come with a template for Talk pages by default. These are easy to access: when viewing any page, you should find a "Discussion" button in the top right (see screenshot).
You will then be taken to the Talk page for this specific page, where you can add a topic or browse existing ones.
If you want to add a topic, you only need to enter the thread name as well as the first message: the structure is sort of like a forum thread.
If you want to reply to someone, you only need to click on their comment and then type your own comment in the box under theirs.
Feel free to use talk pages! They're here to help communicate with other editors, so don't hesitate.
Talk pages are available everywhere, including on user pages as well as protected official ProleWiki pages (such as our editorial guidelines). They are normally freely accessible in read/write permissions for all editors regardless of Trusted role or lack thereof.
An overview of special pages
Special pages can be found here: Special:SpecialPages. They are not related to the wiki itself but rather to its maintenance and administration.
We quickly go through some special pages in this section which you might find interesting in your work as an editor.
The Hub
We created a Hub page for editors to talk with each other and to send announcements from the administration. Feel free to use it if you have a question that affects the whole Wiki.
Sandbox page
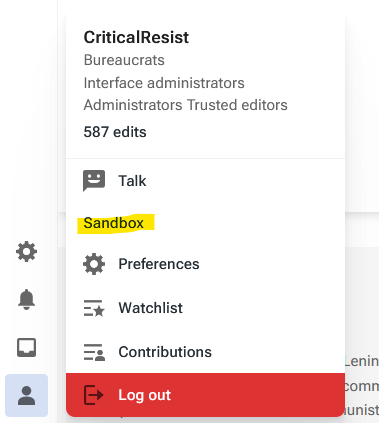
Your sandbox page is a special page that is used to try out anything you want. Most editors like to use it to save drafts they are working on until they're ready to be published into an actual page, since MediaWiki doesn't save draft pages.
To get to your sandbox, the easiest way is by opening your profile on the bottom left and clicking "Sandbox" (as per the picture on the right).
Use that page as you like; you can edit it however you want (to try out templates, formatting, or save your drafts) without impacting the rest of the site if you mess up something.
Recent Changes
Recent changes is the page you might spend most of your time on. It quickly shows the, well, recent changes that took place on the wiki. It's useful to keep up to date with the happenings of the wiki.
Watchlist
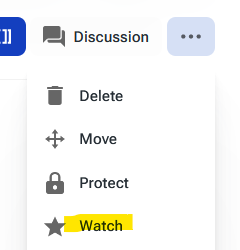
You can place any page on the wiki (literally any page) into your watchlist. Your watchlist can then be accessed here: Special:Watchlist (or from the account icon in the bottom left, under sandbox). From that page, you can also remove any watched page.
Your watchlist will send you a notification (also in the bottom left, the inbox icon) any time an edit is made to a page you are watching. It will also put its name in bold in the Recent Changes page.
To start watching a page, go to any page you want, click the three small dots in the upper-right corner, and then click Watch (with the star icon).
Wanted pages
Wanted pages are interesting to know about. They are pages that are linked in other pages but do not exist yet (the X links mention in parentheses). Hence it is wanted because clearly it's being linked to a lot.
These are worthwhile pages to create and fill up, and wanted pages are always a good place to come back to if you're looking for inspiration or don't know what to write about.
Tip: if you are not a Trusted editor yet, you can ask other editors to create a page for you! Either in the Hub or on the Discord is fine.
Shortcut reference table
You will find all shortcuts available when editing by simply clicking on the ? icon in the top right of the visual editor, and then clicking "Keyboard shortcuts"
- ↑ note example
